Sprouted Wheat Bread
In the morning, rinse and check your grain again. If you have to leave the house and you are concerned your grain might sprout too much in your absence, or if it’sready but you aren’t ready to make the dough, just stick it in the fridge and continue later.
Whenever both you and the wheat are ready, begin with the recipe.
Warm the milk to child-bath temperature, stir in the yeast and let sit five minutes. Pour half the milk into your food processor, add half the sprouted grain (unless you have a commercial size processor you will have to do this in two batches, annoying but true) and turn it on. over a bowl and covered. Rinse again before you go to bed and take a close look at the grain. You probably won’t see any signs of sprouting yet, if you do, stick the whole thing in the fridge for the night.
Transfer to a stand mixer or large bowl, and process the remaining grain, mixed with the other half of the milk/yeast.
When it’s all done, pour the honey, salt and oil on top of the mushy dough, then add the 3/4 cup of white bread flour. Mix on low for a few minutes, or hand knead for 5. Add more flour as necessary to make a moderately soft dough (it will be very sticky, in fact I haven’t tried this by hand, it might be challenging… But resist the temptation to add too much flour or your dough will be stiff and your loaf dry)
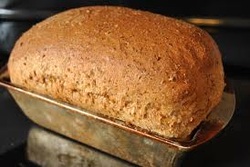
Let rise for an hour or two, until a finger poke does not bounce back. (Keep in mind, both now and when rising the loaf that this dough doesn’t have nearly as much gluten as a flour based dough, so it won’t rise nearly as high.) Pat the dough out into a rough rectangle and roll up into a tight log the length of your bread pan. Butter the pan generously and nestle the dough in. Cover with plastic and let rise for 45 minutes to an hour and a half, or until just shy of the finger poke spring back test. Turn the oven on to 350 F about halfway through the rising process. Bake for 50-60 minutes, or until golden brown and hollow sounding when thumped. Remove from the pan and wrap the hot loaf in a clean tea towel to keep the crust from getting too hard. Allow to cool for at least 20 minutes before slicing! No cheating, you’ll gum up the bread slicing it too soon.
Like all real bread, this will only last a few days sitting out on the counter. Store in the fridge to keep up to a week, or slice and freeze if you want it to last longer.
- 2 cups hard red or hard white wheat berries
- 1/4 cup lentils
- 2 Tablespoons flax seeds
- 1/2 cup milk
- 1 teaspoon yeast
- 1-2 Tablespoons honey
- 3/4 – 1+ cups white bread flour
- 1 teaspoon salt
- big squirt flax oil
In the morning, rinse and check your grain again. If you have to leave the house and you are concerned your grain might sprout too much in your absence, or if it’sready but you aren’t ready to make the dough, just stick it in the fridge and continue later.
Whenever both you and the wheat are ready, begin with the recipe.
Warm the milk to child-bath temperature, stir in the yeast and let sit five minutes. Pour half the milk into your food processor, add half the sprouted grain (unless you have a commercial size processor you will have to do this in two batches, annoying but true) and turn it on. over a bowl and covered. Rinse again before you go to bed and take a close look at the grain. You probably won’t see any signs of sprouting yet, if you do, stick the whole thing in the fridge for the night.
Transfer to a stand mixer or large bowl, and process the remaining grain, mixed with the other half of the milk/yeast.
When it’s all done, pour the honey, salt and oil on top of the mushy dough, then add the 3/4 cup of white bread flour. Mix on low for a few minutes, or hand knead for 5. Add more flour as necessary to make a moderately soft dough (it will be very sticky, in fact I haven’t tried this by hand, it might be challenging… But resist the temptation to add too much flour or your dough will be stiff and your loaf dry)
Let rise for an hour or two, until a finger poke does not bounce back. (Keep in mind, both now and when rising the loaf that this dough doesn’t have nearly as much gluten as a flour based dough, so it won’t rise nearly as high.) Pat the dough out into a rough rectangle and roll up into a tight log the length of your bread pan. Butter the pan generously and nestle the dough in. Cover with plastic and let rise for 45 minutes to an hour and a half, or until just shy of the finger poke spring back test. Turn the oven on to 350 F about halfway through the rising process. Bake for 50-60 minutes, or until golden brown and hollow sounding when thumped. Remove from the pan and wrap the hot loaf in a clean tea towel to keep the crust from getting too hard. Allow to cool for at least 20 minutes before slicing! No cheating, you’ll gum up the bread slicing it too soon.
Like all real bread, this will only last a few days sitting out on the counter. Store in the fridge to keep up to a week, or slice and freeze if you want it to last longer.

 RSS Feed
